Thursday, June 6, 2013

The Handout for my Roman Women's Clothing class

This is the handout that accompanied the most recent class I taught with the assistance of my new roomie.  I'm putting it up relatively soon after the class was taught, since it was taught on the Saturday of Memorial Day weekend!

Chic, not Shapeless
An Overview of Female Garments, Accessories and Style from the Roman Empire

Lady Petronia Casta and Lady Aemilia Rufinia
Email: lorihaigh@gmail.com or superladygeneva@gmail.com

The Roman Empire spans several centuries, from 27 BCE to 476 CE in the West, and 330-1453 CE for the Eastern/Byzantine Empire.  This class will generally cover women’s garments from the Western Empire, and give an idea of how to construct and wear these garments with an eye towards accuracy and comfort.  It will also give tips on accessories and hairstyles to complete the look.

Parts of the Synthesis

Let’s start working from the skin out.  Roman female undergarments are a bit controversial, like most underwear from early periods.  We have no surviving garments designed for breast support that I’ve come across.  We do have Latin terms for such a garment, strophium and mamillare, and some mosaics, frescos and a few statues that lead us to believe that such a garment existed, at least in some circumstances.  The mosaics that depict such a garment are colloquially known as the “Roman Bikini Girls,” and show a number of women engaged in some form of exercise, and are frequently referred to as gymnasts (Fig. 1).  The frescos that happen to show women in enough of a state of undress to display the strophium are frequently of an erotic subject matter (Fig. 2).  The statue below displaying a strophium is of the Goddess Venus (Fig. 3).

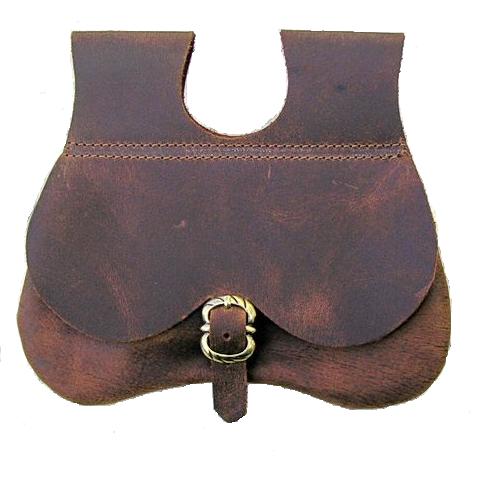
Along with the strophium, the Bikini Girls are wearing a form of underwear, called subligaria (Fig. 1).  There is an extant pair made from leather on display in the Museum of London (Fig. 4).  No one is sure if they were an every day garment or only worn during exercise and certain weeks of the month.  This leather pair is the only extant pair; if any were made of linen or wool, they’ve been lost to time.

The next layer out from the undergarments would be one or more layers of tunica.  Multiple layers could be worn for warmth.  These long garments can be wide tube-like garments in the case of the tunica recta (Fig. 5) or “straight tunic” or could have long sleeves, a tunica manicata (Fig. 6).  Roman clothing was segregated into male and female categories, and wearing items considered the opposite carried a bit of a social stigma.  Women were allowed to wear long sleeves, men shouldn’t.  Likewise it was considered unfeminine to wear short tunicas or to have your tunica be white.

Over the various tunicas, come various types of outer garment, and what one would wear is dependant on their station in life.  If unmarried, a woman would wear a fancy tunica as her outermost dress layer.  Only married women were supposed to wear the stola, a long, sleeveless overdress (Figs. 9-13).  There are several styles of shoulder treatment on a stola: splitting the fabric for the neck and gathering the shoulder line into a bundle (Fig. 9), a simple strap joining the front and back (Fig. 10), brooches pinning the back to the front (Fig. 11), gathering the top line of fabric into a binding (Fig. 12), even a braided strap joining the front and back (Fig. 13).  The stola could be either a solid color, or have embellishment, called institia, along the hem or on the straps.

Over top of the tunicas and the stola, if a woman was going outdoors, she would wear a large rectangular wrap called a palla (Figs. 14 and 15).  This wrap could be draped over the head and pinned to her hair for more coverage (Fig. 14), and was designed to cover the body for modesty.  A special version of the palla was the flammeum, a yellow/saffron colored veil worn by brides on their wedding day.  Togas were the outer garment for prostitutes and women convicted of adultery, specifically because it was a man’s garment (Fig. 16).

How to make the garments

Romans had access to linen, hemp, some silks and cottons, but the most common fabric for Roman clothing is wool.  That being said, the weight of the fabric is going to make the biggest difference in how the garment drapes, and drape is part of what makes the clothing “fit” right.  Light weight fabrics like gauze, crepe and chiffon will hang in small tight folds like the images.  Choose the fabric you will use for these garments based off the weight.  If you are looking to wear Roman clothing year round instead of just as summer garments, try wool crepes or tricotines and soft, light-weight silks for insulation and wear several layers.  For summer, limit the number of layers; try thinner linens, breezy cotton gauzes or blends of vegetative fibers.  To test if a fabric is light weight enough, gather up small folds in your hand and hold it in the air.  If the folds stay relatively small all the way down, it is light weight enough to use.  If the folds get larger or don’t fold much at all, it’s probably either too heavy or too stiff to use.

These garments don’t really have much in the way of cutting patterns, as the vast majority of them are constructed from rectangles.  The strophium is a long band of fabric, roughly 8-11 inches wide by 120” long, and wrapped around the breasts to keep them contained.  This wrap can be seen in both Fig. 2 and Fig. 3.

The extant pair subligaria were an hourglass shape, with ties on the side like modern bikini bottoms.  Theory is that women wore this shaped pair of undergarments, and men wore wrapped loincloths.
The tunica recta was woven as one long piece and a fold was placed on one side with a seam up the other side.  Modern fabric widths make this a little more difficult.  The look can be accomplished by cutting two pieces of fabric, the full width by the wearer’s shoulder to hem measurement plus some length for blousing.  The two pieces are sewn most of the way along the selvedges, leaving enough opening at the top along the selvedge for the wearer’s arms to go through.  The top of the tube is hemmed and locations along it are stitched together to join the front and the back.  It is more comfortable to allow a little more drape in the center front than the center back section so the tunica doesn’t strangle the wearer.  An alternative version of this garment is made by taking one piece of fabric twice the length of the wearer’s shoulder to hem plus blousing, and cutting a horizontal slit in the middle for the head, and sewing the selvedges the same as the tunica recta that is open on top (Fig. 7).

The tunica manicata was most likely sewn like the tunica recta with sleeves inserted into the side seams.  I’ve created a method that works for me and approximates the look while being more comfortable in my opinion.  Instead of two panels that are the same width across front and back, I use a very narrow panel for the back, and a much wider panel for the front.  There are also side panels added that are a shorter length than the front or back, the height being made up for by the sleeves.  This gives a garment that doesn’t fall off the shoulders (though there are several images of just such a thing happening, see Fig. 8) but still gives ample fullness for walking.

The stola is also very simple rectangular pieces, with either the top edge of the fabric gathered into a band, gathered and stitched to a strap, hemmed and pinned similarly to the tunicas, or there is a vertical slit in flat fabric and that is gathered.  The panels are usually made from the full width of the fabric, and are shoulder to hem plus blousing in length.

Pallas are also rectangles.  (Sense a theme?)  Fabrics 45-54” and 2-2½ yards in length work well for a palla, or one could use a sari, as that is how I arrived at that measurement.

Togas are roughly the height of the wearer and two times their height in length.  Early togas were cut in a semicircular shape, while later togas were cut more complexly.  Both pallas and togas are draped starting with the ends in front over the left arm, around the back, under the right arm, and back over the left.  See Fig. 16 for both draping techniques and cutting diagrams for togas.  I will often start with the tail hanging down the back first, as this makes adjusting the garment to go up over my head easier.


Accessories

The most important accessory for this outfit is a belt.  Women’s belts were called cingulum and could be a cord or a woven sash.  The cingulum is what makes the garments fit in a flattering manner.  It should be fairly narrow, no more than three inches wide and long enough to wrap around the body twice and still hang down past the knees, approximately 5 yards in length.  Center the belt between the breasts and right underneath them on the front, wrap the cingulum around to the back and cross it there or give it a twist to keep it tight, wrap the ends back to the front and tie it tightly around your waist.  The belt should cinch in all the fabric as closely to your body as you can handle in order to give waist definition and make the garment flattering to your figure.  Blouse the extra length over the part of the belt over the waist, and distribute the folds of the skirt evenly around the body.

Roman women’s shoes could be as complicated as the garments were simple.  Rich colors, elaborate cutwork, gold leafing, and fancy laced patterns are all exhibited on extant Roman shoes.  Women wore mostly enclosed slippers or low boots when outdoors, which could be worn with ankle-high, woven-fabric, socks in cold weather.  Sandals, similar to modern thong sandals, were worn primarily indoors, though many statues show women wearing sandals and pallas.  Ladies’ shoes were often made of leather or fabrics, and certain colors were reserved for certain stations in life.  Red was reserved for the senatorial class, yellow/saffron was reserved for brides and for expensive courtesans.

Jewelry came in many and varied styles.  Gold was preferred, and emeralds and pearls were frequent favorites.  Earrings were usually drop or dangling styles.  Necklaces can be strings of beads, chains with stones, have pendants, or granulation.  Fibulas were used to fasten clothing and hold garments in place.  They can be simple wires, elaborate “crossbow” shapes, or complex enameled affairs.  Bracelets and anklets feature in mosaics and paintings.  Rings often feature cameos carved in semi precious stones.  Many paintings feature women wearing gold laurel wreaths, which may not work for many Scadians.  There are also paintings that feature a gold hairnet that sits on top of the head. 

Along with shoes and jewelry, Roman women’s hairstyles often display high levels of complexity.  The simplest hairstyle of early Roman women was all the hair pulled back to a low bun.  Later styles incorporated elaborate and complex braiding and curling to create height and large buns.  I can go on for quite some time on Roman hairstyles, contact me if you’d like more information on it.

We hope this helps when putting together your Roman clothing.  Please feel free to contact us for more information about any of the garments discussed in this class, or for shopping advice.
Fig. 1 4th Century AD mosaic found near the ancient Roman Villa del Casale in Sicily, M Disdero 2006
Fig. 2 Fresco found in the House of the Centenery in Pompeii 
 Fig. 3 Venus from Museum Burg Linn, Germany
Fig. 4 Bikini-like leather subligaculum found in excavations of Roman London (Museum of London)


Tunica Types


Fig. 5 Tunica Recta                                       Fig. 6 Tunica Manicata


Fig. 7 Tunica Recta with open top                           Fig. 8 Wide necked tunica falling                                                                                       off the shoulders


Stola Types
  

Fig. 9 V-necked                                                         Fig. 10 Thin strap


Fig. 11 Brooches                                  Fig. 12 Banded                                   Fig. 13 Braided


Fig. 14 Wrapped palla over                             Fig. 15 Palla off the head
the head


Fig. 16 How to wrap a toga; 5, 6, and 7 being toga shapes


Friday, March 8, 2013

Smart phone post...

First update I'm trying from my new smart phone. I finally took a picture of the Overly Ambitious Embroidery Project of Doom. I have, in fact, finished one of the colors in it. The slate blue in the knotwork on the back of the neck is finished and there is just a little in the center front to bring the color around.

The elements are a combination of a couple different manuscripts, and I specifically blended a few images of the Eagle of Saint John to create a "hawk" because of Himself's arms. Much of the design us from various pages from the Book of Kells. I keep thinking that at some point I'll embroider some cuffs to go with it, but as the collar has taken two years and frequent lost motivation, we'll have to see.

Tuesday, January 29, 2013

Finally some pictures...

Fancy new dags to wear with an old hat
Even if they are crappy phone pictures of Himself!

These were taken in the Doubletree Hotel in Portland the Saturday of 12th Night.  They are clearly not the best of photos, I'd like to take some better ones eventually, but this lets me put up something at least.

You can tell from his happy smiling face that he really likes his new houp.  I'm proud of the fact that I got his houppelande out of 8.5 yards.  Yes, that is a floor-length, giant, drapey-sleeved houppelande out of 8½ yards.

Showing off the pouch he made to go with it,
and the tenner which was a wedding present.
How you ask?  I took the lessons taught us by rectilinear construction and turned them on their sides!  Ignoring the sleeves, which took up just under three yards, the body panels are made of "gores" cut just like making inserts for skirts on T-tunics.

I measured his shoulder to hem and cut a full width panel of the fabric, a light weight wool gifted to me years ago when I thought I would make a Cranach gown out of it.  (I was young, I didn't realize it was too light weight when I fell in love with the color)  Luckily I was lazy, and my best friend didn't mind me re-purposing her gift into something for my Hubby.

First Crappy MS Paint Diagram
Back to the cutting.  The body is made from three full width panels of fabric, the first measuring from shoulder to floor with hem allowance, the second being back panels and a couple inches longer so they drag the floor when he walks (not a train, but just long enough to be imposing), and the third full width panel is halfway between the length of the two.  All three panels were folded in half, and cut into eight wedges using the cutting layout show in this crappy MS Paint diagram, not to scale.  The short end of the wedge is really all that mattered, his shoulder seam length was about six inches long, so each short end was an inch with seam allowance.  The other side of the wedge was whatever it worked out to be.

Second Crappy MS Paint Diagram
The pieces were then arranged into a circular shape, the shortest four in center front, the longest four in the center back and the middle four arranged along the sides, two wedges for each quarter of the body.
The second crappy MS Paint diagram shows the layout of one of the front panels, totally not to scale.

Doing the body panels this way meant I had practically no scrap left over from cutting.  This cutting method is great on a solid color houp because you can barely see the seam lines, and sewing straight to bias forces the fabric into draped lines at the floor.
Crappy MS Paint Sleeve Diagram

The sleeves are done in a strange fashion that was really hard for me to wrap my brain around.  Himself's knight's lady is a Laurel, and a good friend of his.  She's done a few houppelandes and when I asked her advice she said to make it like an angel wing sleeve, but to put the S-curve into the straight part of the half oval instead of the curved part.  This causes the seam to fall straight down the back, and the curved edge to fall back from the wrist, more or less keeping it completely out of anything you reach for.  The dags get cut into that curved edge, and I used a template made from a 3x5 card to trace them out.  I intended to do a gold leafed pattern on the sleeve of his 12th Night Houp, but I ran out of time/brains to figure it out.

A repro poster site
I love the thriftiness of this layout for the body.  I'm already planning to make him more houppelandes eventually, since I've decided this year is about making him new garb.  I'm only allowing myself to start one new project for me, I'm trying to make everything else for him or for our roommate.  I'd like to do a shorter length houp with rectangular pleated-in, gold embellished sleeves like the cup bearer in the January image of Tres Riches on the far left.  This is one of the main inspirations for the pouch he made, and we've developed some theories about pouches that should make for an interesting A&S entry.  My tenure as the Baronial A&S Champion is coming to a close, he's planning to enter the pouch into the competition.

Hope this helps save some people a little fabric when making a houppelande.  I don't know how well my theory would work with a brocade, but for a solid color wool, I like the way it works.

Thursday, January 3, 2013

Working on the Houppelande...

I'm testing a construction theory that if it works, could revolutionize the houppelande.... I realize that's kind of a silly thing to say.  Lets go with could revolutionize the recreation of the houppelande?  I'm using a lovely light weight blue wool I was gifted with years ago when I thought I would make a Cranach gown out of it. (The wool is way to thin for rolled pleats so it's better off here.)

I'm trying out this theory where the body isn't made with quarter circles, but instead multiple "gores".   I put these in quotation marks because it really isn't a gore without going into the fabric of the main body, but it's the way I've been thinking about it, since that's how I cut them out. I cut out 24 wedges from the fabric and assembled them for the main body.

I'll go into more detail later, hopefully today, but for now I need to clean up and head to bed.

Monday, December 24, 2012

Everyone knows if I promise something as a Christmas present...

not to expect it before March....

I cut out the roommate's apron-dress tonight.  I'm hoping to have it all sewn up tonight or tomorrow and wrapped for her to open when she gets back on the 26th.  The apron is a good probability, it's all cut out and made of a thick lush teal wool from Pendleton, so I don't have to finish the seams.  I've also read somewhere the theory that Norse sewed their seam allowances on the outside of a garment and the decorative seam treatments are designed to finish the edges in a visible way.  It's an interesting theory and I'm giving it some thought, although not for Wednesday.  The garment is intended for An Tir's 12th night, so I also need to get the under dress cut out next week.

Extant Houppelande 1396
Also somewhere in the next couple months I promised The Boy a floor length, angel-wing sleeved houppelande as his Christmas present.  I have the wool, I just haven't quite figured out the cutting pattern I want to use.  The circle style has its advantages in simplicity, but isn't really fabric efficient.  Also the extant example is believed to be made from multiple "wedges" cut much like gores are cut for other dresses.  Of course I can't find the website I saw that on before...  I'm thinking about doing the wedges because the fabric I'm using is a plain blue wool which means I don't have to worry about an up and a down on it.

I'd like to finish it before 12th Night, but I'm not sure.  I've got a pair of braies mostly finished, and a shirt cut out and partially sewn. I'd really like to get a pair of hose to go with it finished, and a doublet to go under, since that would be most accurate, but I don't know how likely the doublet is any time soon.  I have a heavy red linen that I think would look good for the hose, I just need to find the time to pattern them, and eventually I'll get them sewn.  I'm thinking maybe a green or black linen doublet for under the blue houp, because those colors would look really good with the red hose.
April
August

My wifey sent me some gorgeous gold brocade and fifty bells to make himself a baldric out of.  The Boy is a fan of the Tres Riches styles so I'm planning a shoulder drape like the one in April or August's miniatures, and I'll see how far down his back I can make the bells go.  I might have to find some other kind of findings to spread out the bells.

I really should get back to the sewing.  How to Train Your Dragon is on, some how I find that to be a perfect accompaniment to sewing Norse clothing.

Monday, December 10, 2012

Just a bit of a distraction....

The style Himself likes
The Boy is rather bored lately, what with being unemployed and being at home all the time.  While this has manifested in tasty tasty noms for dinner, it also means we've been looking for projects for himself to work on.  When visiting the Tandy Leather here in town to look for materials for himself to make a kidney pouch, I found some GORGEOUS red leather that had to come home with me to make Roman shoes.

The trouble is, I don't know exactly what style it is that I want to make.  I've never made shoes before, so I want something relatively easy to create for my first endeavor.  I've been collecting images for a while, and I thought I'd put them up here to see if anyone had an opinion on which I should make.


5th century womens shoes found in Egypt
Photo by Mary Harrsch,
located in the Getty
I know I want Roman shoes, something closed toed and flat, but I can't decide between the simpler slipper style which I think would be easier for a first try, or the gorgeous cut work slippers that I've been lusting over for a while.

 If I choose the simple slipper style I'd want to figure out how to do the gold embossing found on both of these examples.
Shoes found at the Antonine Wall

The Low Ham Boot
I'm also considering doing a simple slipper style for the first pair, but doing a bit of a cut work pattern on them like the pair on the left without the ties to lace it closed.  I like the patterns and texture created by the cut work.

Sara Kerr's pattern mockup
I've found several tutorials and descriptions on how to make turn shoes, and some ideas on how to pattern shoes with a duct tape "cast" of your foot.  I'm working on getting more research together, and looking for opinions on what style to do before starting, but I do want to get started sometime in the next week and a half.  I'm daydreaming about entering a Roman outfit in the 12th night costuming competition.

I'm thinking about heading up to the Pendleton outlet before Jule next weekend to see if I can find some wool gauze to make "winter Romans"  Since most of my Roman gear was made in Texas, it's mostly made of cotton or a linen/cotton blend.  I'd like to make an outfit for that competition, but it's about a month away and I haven't made any of what I would like to enter.  On the positive side, it's Roman, so it's not that hard to make quickly.  But the wool would be more historically accurate, and it would be nice to have something that was more correct than what I'm wearing now, and it would be great to have something to wear in cooler weather that was my persona.

Thursday, December 6, 2012

A couple new projects in the works...

and just about a week to finish them.  On the 15th, I'm headed up to Beaverton, (just outside of Portland) because a friend invited me up to dance, and I just happen to have that day off work.

Jen Thompson's gorgeous dress
I'm making new sleeves to go with my Florentine from three years ago.  As with the vast majority of people who have made this dress, I was inspired by Jen Thompson of Festive Attyre, whose information is currently in transition from one incarnation of her site to a new one.  The photos that aren't of me are from the website Sophie Stitches that has a collection of images for her research.

I did the dress out of Jo-ann cotton velveteen, and it's pretty enough that I'm still happy with the results.  I made the corded corset, and the giant puffy sleeves, and the striped turban, just like Jen's.  But I've had two yards of the velveteen floating around in my stash, and those matching sleeves with the beaded tassels have been drifting around in my head for years.

The Preaching of Saint John
 the Baptist, 1520, Bacchiacca
Portrait of the Artist's Wife, 
1513-1514, Andrea del Sarto

Me, photo by hubby for my portfolio
So, I'm making the sleeves to wear next weekend.  I'm down to just hand sewing, but that's flat felling internal seams, tacking down the chocolate silk trim, making the beaded tassels (still have to figure out what I'm going to do for the tassels, shredding the silk fabric isn't working well...), tacking down the bias facing on the sleeve heads and adding lacing rings.  I didn't line the sleeves since I didn't have anything I thought would look good as a lining, and I didn't really want to spend any money on these sleeves.

However, the sleeves are on the back burner as far as sewing goes right now.  I'm working on a gift for a friend's birthday, which is also the 15th.  I'm working on a semi secret gift, I'll try to get pictures of the finished project to post, but right now I'm working on the embroidery that's a cross between between the Mammen embroideries and her coat of arms.  It'll be pretty simple, dark blue silk outlines in back/stem stitch on white linen.  I'm hoping to finish it soon.

The other project that I'm working on is an exciting development for my whole house.  I was graciously gifted with a copy of Sally Pointer's book on cosmetics, The Artifice of Beauty, for a wedding present.  I've been interested in historical cosmetics, specifically Roman cosmetics, due to my interest in the duties of an ornatrix.  Sally Pointer's one of the few people that I've come across so far with information on Roman cosmetics.

For the Jule event on the 15th they're having a largess competition, and my super sekrit entry will be a batch of her Alkanet Lip Paint.  It's interesting, right now I've got a jar of chopped alkanet root soaking in sweet almond oil to draw out the color, and The Boy has been playing with a variety of methods for creating a tincture of myrrh. Either Thursday or Friday this week I'll be blending the alkanet oil with some beeswax and a little myrrh tincture and then putting them in little jars.  It's probably old hat for other herbalists, but I'm excited to be branching out into new realms for myself.

That's what I'm up to right now, I'm hoping for new pictures soon. Here's hoping...