Friday, May 11, 2012

I know I promised this months ago...

But here it finally is,

Achieving Livia's Look:
Recreating an Ancient Roman Hairstyle


This Style in History:

Roman hairdressing has shown an amazing variety in styles.  Tall halos of curls, elaborate braided confections, and simple matronly buns, Roman women wore the hair in a vast array of personal styles.  One iconic style is that of Empress Livia.

This bust of Empress Livia resides in the Ny Carlsberg Glyptotek (fig 1-5).  The museum has dated this particular piece of marble to 4 CE or later, and believes it to be a copy of an original made ca. 27-23 BCE.

Livia’s style is deceptively simple.  She wears her hair with a center section combed forward into a “nodus,” a feature she is known for, the rest pulled back from the face along the sides in loose rolls to meet in the back with a complex bun wrapped with braids.  The method for securing such a style is unknown, but there are theories.

I believe this bust to be a representation of a casual hairstyle Livia wore.  This style is shown on many other busts, in a variety of materials, most depict Livia, but some show other women have copied her style.

Being an empress, Livia was the model for a lot of sculpture.  Though Romans tended toward an eternally young depiction of people (statues made of Livia when she was 60 look much the same as when she was 20) there is certain realism to them (Bartman 19).  There are examples of Livia shown as an allegory, most frequently as the goddess Ceres, with a floral crown and holding a cornucopia, (fig. 6) or in the style of Pudicitia, where she is covered modestly by a veil (fig. 7).  In some of these styles she wears a similar hairstyle to the featured one, and sometimes her hair is simply parted down the center and flows to either side in waves.  In every allegorical image, she wears something on her hair, a veil, a diadem or a wreath of flowers.  This leads me to believe that her uncovered style is not allegorical.

Potential Historical Methods:

While no one knows for certain how these hairstyles were created, experimental archeology gives us some clues as to the methods necessary for securing them.  There are three methods for fastening styles that are possible with Roman hairstyling, “gluing,” pinning, or sewing.  Along with the arguments for and against each of these methods, this section will include descriptions of other tools a period hairstylist would use, and a brief discussion of who these historical hairstylists would be.

Gluing:
A method for securing hairstyles that involves coating the hair, either part or all of the strand, with a substance that sticks the strands together.  Beeswax and resins are capable of being documented to the first century CE; gel made from soaking or boiling flaxseed is theoretically possible, and water soluble gum arabic would have been available, though perhaps expensive since it would need to be imported.

It is possible that the entirety of the style was held together with “glue,” but I find it extremely unlikely.  This style, even carved in heavy marble, shows a lightness to the hair that wouldn’t have been possible if all the hair was coated in product.  Also, seen easier in the plaster cast of the bust of Livia, (Fig. 8) fine, wispy hairs along the hairline are present.  That a sculptor found them necessary to carve into the busts instead of eliminating them for ease of sculpting, seems to prove their existence.  These wispy hairs wouldn’t be present if all the hair were slicked back with styling product.

Romans who could afford it bathed daily, including women and children.  Baths were deep enough to be fully immersed, suggesting that the hair was soaked along with the body.  If so, a bath would destroy a hairstyle created entirely by water soluble adhesives.  The frequency of bathing would suggest the need for a more easily removable fastener.

Pinning:
Believed by some to be the most common way of securing a Roman hairstyle, this method uses pins to hold the hair at specific points.  These pins would be straight, single pronged pins, like sewing pins or hair sticks, as U-pins were not created before the 18th century (Stephens 120).  A profusion of decorative hair sticks exist in archeological record.  Made of ivory, bone, wood, jet, gold and other materials, they often feature carved heads or elaborate miniature sculptures at the top (Stephens 112).  They would be easy to insert into hairstyles, and be easy enough to remove prior to a daily bath.

However, the lack of their presence in art makes it more unlikely that these hair “pins” were used to create these styles.  Extremely few portrait busts show large hair sticks, and most of those only show one, insufficient to be the sole means of support (Stephens 117, 119) (Bartman 12).  If the styles were constructed using smaller pins, it would require numerous smaller straight pins to secure the style.  These small pins could possibly be hidden from sight, but I’ve found no report of a large number of small pins in grave finds.

Sewing:
Sewing hair as a method of securing a style requires a large needle, and sufficient length of thread to stitch through elements of the style, to prevent portions of the style from coming loose.  Thread was most likely wool, as it is the most common fiber in Roman clothing, and Juvenal mentions a slave working wool while the mistress’s hair was being styled (Stephens 124).  By using a thread of similar color to a lady’s hair, the thread becomes almost invisible, and more closely resembles period artwork.

The use of the Latin word acus causes some confusion amongst translators.  It appears to most often be translated as pin when describing hair arranging, but when used in conjunction with sewing terms, it means sewing needle.  Janet Stephens would argue that this word should be used for needle in both cases, specifically citing Sextus Pompeius Festus, whose Glossaria Latina has an entry on hairdressing and needles that states: “ACUS dicitur, qua sarcinatrix vel etiam ornatrix utitur” (that which the cloth-mender as well as the hairdresser uses is called a needle.)  That the same type of tool was used for both sewing of cloth and sewing of hair explains the difference in needle sizes in Ancient finds.  The size of needles believed to be used for hair sewing are larger than would be used for sewing cloth, commonly ranging from 10-15 cm, and being 0.5-1 cm in diameter, and have blunted ends.  Roman needles this large are usually made from bone or ivory, though there have been finds of gold and glass (Stephens 113).

In addition to finds of large needles, there is a frieze on a tomb that depicts objects connected women’s work, and a needle is depicted with a cosmetic spatula on the right side.  The spindle for creating thread is placed at the far left, with a variety of other elements between them; a clear separation of the two subjects.  There is also the “beauty case of Cumae” that contains jewelry, a mirror, several cosmetics related items, and a complete set of hairdressing tools, a comb, bodkin, spindle and needle (Stephens 122-123).

Ornatrices:
Roman hairstyles can be complex, and often require at least one other person to arrange the hair, if not several.  Taking down a style is also complicated; if sewn, one must separate the wool thread from the lady’s hair, cutting only that thread.  This requires the presence of an ornatrix. 

Many Roman ladies of wealth had a slave, or several, just for arranging their hair.  This hairdressing slave is known as an ornatrix.  Images of hairdressing performed by a servant are seen in tomb carvings (Bartman 4).  There are several instances in Roman literature of orantrices, and they are frequently mentioned as the recipient of abuse from their mistresses for pulling hair or making a mistake while styling it.  Juvenal’s Satire 6 features two slaves actively working on their mistress’s hair, while a third who has retired from work due to age sits and spins thread while giving advice.  Her skill is respected and she was once an expert of styling (Stephens 124).

Other Tools:
Aside from the needle and thread, arranging the hair of a Roman lady would require a few other tools.  A comb was necessary to detangle and smooth the hair, a hair bodkin for parting sections, a curling iron for later styles, and a mirror for the lady to view all angles of the style (Stephens 123).

How I Did It:

Start with clean(ish), combed hair.  This style works best with hair of near waist length or more.  Begin the style by creating the center section, parting the hair from the back of the scalp to approximately the center of each eye.  Comb this section forward, and secure the remaining side hair for the time being.  This is easily done with a hair bodkin. 

As seen in the images of the Lady from Cerveteri, in the Ny Carlsberg Glyptotek, the center section is parted in a downward point near the front of the hair. (Fig 9)  I believe this part indicates a place where the hair is bound together, creating a secure spot to anchor later steps of the style to.  Bind off the section of hair, either with a needle and thread, or, if using modern elements, with a small hair elastic.  Pull the bound section and the rest of the center section forward and bind them together at nose length.  Braid this section below the binding down to the tips.  The tips can be bound with thread, dipped in water to temporarily stick them together (Stephens 123), or modernly, wipe gel on them to bind them together.  Sew the two bindings together to create a loop at the center forehead (called a nodus), and stitch the braid down the center section.  Then release the rest of the hair.

Part the rest of the hair down the center below the wedge.  Use large sections to create French twists down both sides of the head.  Some busts show twists all the way to the bun in the back; some only use part of the hair on the side, as clearly seen on the Bust of Livia in the British Museum. (Fig. 10)  Once these twists rolled to the nape of the neck, bind them into a pony tail.  Separate out about a third of the hair from each twist, and create a braid on either side of the head.  These two braids will wrap around the finished bun.

Take the remaining unbraided section of hair and pull the tail through the gap made by the center section of the hair, leaving a loop of hair.  Stick a hair bodkin through this loop to prevent it from being pulled through the gap.  Smooth out the tail below the loop.  Pull that tail back through the gap, creating a second loop below the first, inserting another bodkin to keep the loop from pulling through.  The two braids should emerge from either side of this loop.  What hair remains of the unbraided tail can be wet with water and wrapped around the bun.  Secure this bun with large stitches through it.  Wrap the braids around the bun, securing the braids with stitches.  The style is complete.

A few notes on constructing this style.

When creating the central section, start from further back on the head than you expect.  Most of the images show that the point of the central section is covered by the bun.  While the most frequent location for this large bun is the nape of the neck, the Late Republican Woman in the NY Met shows a very high bun, perched at the back of her head. (Fig. 11)  Her bun is also smaller than most of the examples, and rounder rather than the flatter versions that are more common.

There are a few other alternatives within the style that are exhibited by various busts.  The bust of Livia in the Ny Carlsberg Glyptotek doesn’t feature a central braid, but smooth hair. (Fig. 1)  Either all the hair is rolled into the nodus, or the tail of hair is some how smoothed down the central section of hair.  Also there is an interesting example of the nodus itself being braided in a herringbone style. (Fig. 12)  Most of busts of Livia herself feature a nodus that is full and circular, though when her nodus is paired with a central braid, it is often more horizontal, as can be seen in the bust of Livia Drusilla that resides in The Archaeological Museum in Selçuk, (Fig. 13) or in the bust of Livia from the Crypta Balbi section of the National Museum of Rome, (Fig. 14) where the nodus has broken off, but the shape can be determined by the remaining outline.

The less rounded nodus is also a common feature for women copying the Empress’ look.  Images of the Late Republican Woman, (Fig. 11) present a fairly flat nodus, with the top layer clearly shown.  The Roman Lady from Cerveteri, (Fig. 9), displays a nodus with barely any height, all the hair is drawn together on the top with smooth curves.

A third variation can be found with the side rolls.  In a few examples the side rolls are smooth, but still have volume, instead of sectioned, as in the Late Republican Woman’s hairstyle. (Fig 11)  Visible on the bust of Livia carved from basalt, in the Louvre, (Fig. 15) are large waves that undulate down the hairline on either side of the head.  The carving indicates that the hair isn’t rolled, but loose pulled toward the back to maintain the waves.

To Wrap it Up:

This elegant style is hardly simple, but with the help of a handmaid, friend or servant, who is a capable hairdresser, and a few simple tools, the nodus style of Empress Livia can be achieved.  There are a variety of small changes that can be made to personalize the style, and it is a beautiful way to finish an early Roman outfit.
Fig. 1
Fig. 2

Fig. 3

Fig. 5
Fig. 4

Fig. 7
Fig. 6


Fig. 8
Fig. 10
Fig. 9


Fig. 11
Fig. 12


Fig. 13
Fig. 14


Fig. 15


Bibliography

Bartman, Elizabeth. "Hair and the Artifice of Roman Female Adornment." American Journal of Archaeology. 105.1 (2001): 1-25. Print.

Basalt Livia, (fig. 15) Louvre, Photo by Joe Geranio.  http://www.flickr.com/photos/julio-claudians/5826158704/  Jun 12, 2011.  Dec 28, 2011

Bust of Livia, Copenhagen 1444 (fig. 1-5). Ny Carlsberg Glyptotek.  Photos by Roger Ulrich.  http://www.flickr.com/photos/roger_ulrich/5401662363/  Jan 30, 2011.  Dec 28, 2011.

Bust of Livia, (fig. 10). British Museum, Photo by Roger Ulrich.  http://www.flickr.com/photos/roger_ulrich/5083966797/  Oct 15, 2010.  Dec 28, 2011.

Late Republican Woman, (fig. 11) NY Met, Photo by Roger Ulrich.  http://www.flickr.com/photos/roger_ulrich/4349761771/  Feb 11, 2010.  Dec 28, 2011

Livia, (fig. 14), Museo Crypta Balbi, Rome.  Photo by Rien Bongers.  http://www.flickr.com/photos/antiekpubliek/4069196309  Nov 2, 2009.  Dec 28, 2011.

Livia as Ceres, (fig. 6) Louvre, Photo by Joe Geranio.  http://www.flickr.com/photos/julio-claudians/281634307/  Oct 28, 2006.  Jan 11, 2012.

Livia Drusilla, (fig. 13) Selçuk Museum, Ephesus , Photo by Christoph Houbrects.  http://www.flickr.com/photos/crisdefeu/3936828412/  Sep 20, 2009.  Dec 28, 2011

Liva from the Villa of the Mysteries, (fig. 7)  Photo by Joe Geranio.  http://www.flickr.com/photos/julio-claudians/3534732349/  May 15, 2009.  Jan 11, 2012.

Livia Tunisia, (fig. 12). museum unknown, Photo by Joe Geranio.  http://www.flickr.com/photos/julio-claudians/2422218499/  Apr 18, 2008

Plaster Cast of Bust of Livia, Copenhagen 1444 (fig. 8) Photo by William Storage.  http://www.flickr.com/photos/bstorage/4045212257/  Oct 25, 2009.  Dec 28, 2011

Roman Lady from Cerveteri, (fig. 9) Ny Carlsberg Glyptotek, Photo by Roger Ulrich.  http://www.flickr.com/photos/roger_ulrich/5102631473/  Oct 21, 2010

Stephens, Janet. "Ancient Roman hairdressing: on (hair)pins and needles." Journal of Roman Archeology. 21. (2008): 111-126. Print.

Monday, May 7, 2012

The one and only image I've found that might indicate French Braiding is Period...

So I haven't found much proof  that augmentation braids are appropriate for medieval hairstyles.  A vast majority of hairdressing is covered for the final image, usually with a variety of veils, but sometimes with hats; however, I have come across a singular image that appears to be a French braided style.  The trouble is, I only have the one image, and the website I found it on doesn't give much information on the source.  The webpage belongs to The Medieval Combat Society, a reenactor group in the UK that specializes in 13th and 14th century.  They have a huge collection of images for Female Civilian Clothing, composed of tomb effigies and grave brasses.

French Braids? 
The specific brass that appears to be French Braiding dates to 1335, depicts Elizabeth de Northwood, and should reside in Minster Abbey.  There is one extremely confusing word in the extremely brief description, the word copy.  This word causes me to question the actual date of the brass, but unfortunately it has gotten very late, and I've had a long day, so my Google-fu isn't what I would wish it to be.

Elizabeth's hair has some natural wave to it and is braided from the temples like many other hairstyles for this period, but the exciting part is the way the braids start off tiny at the top of her head and grow larger as they braid towards her ears.  This seems to indicate that more hair is added to the strands as they pass over each other.  The V-point within the braid is a bit of a conundrum, because it would normally indicate a french braid.  (Duth or cornrows have an upward point instead of a downward.)  However, gathering the hair in a normal French Braid doesn't result in the sharply defined edge of braid as in the image.  See the smooth sections in the below image, stolen from long-haircuts.com, as they join with the previous strand, no clearly defined edge of the braid.

There are some techniques for braiding that will cause the braid to flip over and give a clearly defined edge; it  is created by only augmenting the braid from one side of the head.
French Braids Hairstyle


It is a baffling image for me, and the source is just as confusing.  What does it mean copy?  Every time I come across the image online it is the same one, but there is no description of the image past what the Medieval Combat Society has. How are these braids accomplished?  The loose hair between the braids and the face on either side creates a challenge to recreating the style if it is an augmentation braid, as the hair is left loose enough to maintain its wave, not impossible to do, but not the sturdiest of styles.

There is also a simpler explanation, that the braids are actually being drawn from the back of the head down by her ears and are tapering out at the top.  A plain braid follows more accurately the myriad of other examples from the time period, but I'm still looking for the elusive proof of French Braiding in the Medieval Period.

Monday, April 30, 2012

Having trouble writing up my classes...

I've promised (and eventually sent in the info about) two classes on hair that I'll be teaching at Egils, but right now I'm having trouble figuring out what exactly to talk about in these classes.  The first, boringly titled, "French Braiding For Beginners," is a hands on tutorial on how to do augmentation braids, (French, Dutch and Cornrows).  It'll have a brief bit of explanation and demonstration before letting the students at each other's hair.  I haven't figured out if there will be any kind of handout, as I don't really want to spend money.

The second class is the one that's really holding me up.  The Boy and I talked about it on the way back home from the event we attended on Saturday.  I knew I wanted the class to be about authentic hairstyles, since French braiding hasn't been documented for most periods.  Unfortunately, authentic hairstyles is a very broad subject, and one I'm not as well versed as I would like to be, since my specialty is Roman.  The Boy suggested that I do a tutorial on hair sewing, but I was having a hard time envisioning the subject as a full class.  I get rather short sighted on things that I do well, and often don't realize that it may not be obvious to everyone how to accomplish some of the things I do.  So, talking through the class with Himself, we decided the class should have a brief discussion of the historical plausibility of sewing hairstyles together, followed by a basic tutorial in a hairstyle or two.  The Boy suggested my Norse braid loops, since they're simple, many ladies up her wear Norse, and, provided the student has long enough hair, can be accomplished on their own hair.

Odd how often my "attentive"
photos seem "surly"
The other option I'm thinking about for a tutorial in hair sewing is hair taping.  I've gotten pretty good at doing hair taping on myself, and fully believe this style was done by middle class women because it can be done to one's own hair with a minimum of effort.  I also believe it to be the structural basis for some hat styles, especially late period styles.  My introduction to hair taping was through Faoiltighearna's webpage on taping, but I've developed a few theories of my own since then.  The image below from her page of examples shows a woman wearing a cap similar to the style worn throughout several countries and centuries.

http://www.mfgraffix.com/hird/faoilt/examples.html

Those are my thoughts so far on the classes I'll be teaching at Egils.  Now to try to figure out what to say in my discussion without gushing enormously over the ancient hairstyle goddess Janet Stephens.  Check out her YouTube Channel, it's awesome!

Sunday, April 29, 2012

Trying something new...

So I'm going to try doing something new here on the blog, a period hairstyle of the month, every other week or so, maybe if I'm really dedicated it'll be a weekly occurrence.  I'd like to showcase a style, with citations of sources, and briefly explain how I believe the style was accomplished.  And of course, there will be photos!

I'd like to start with the style my hair is in currently, one I'm calling Norse Braid Loops. I first came across this style from the Viking Answer Lady's website on hairstyles when looking for proof of braided pigtails existence about a year ago. I know many women will wear their hair in braided pigtails with their Nordic clothing, and wanted to prove this was accurate.  Gunnvör mentioned, "women with their hair worn in two braids, falling to either side of the head beside the cheeks" depicted on carved stones from Cumbria.

So I decided I had to look them up.  I found W.G. Collingwood's article on Google Books, and copied the photographs.  I had only a passing interest in Collingwood's article about the stones, and skimmed it to see what he had to say about the hairstyles.  He says, "They have long plaits of hair curled at the ends (not aureoles nor hoods) which suggests that they are meant for female figures."  I took his paper with a decent dose of salt as it was printed in 1907.  It is clear from the images that the figures have their hair in either one or two sections, some show evidence to texture carved in, probably to indicate braiding, and many have a curl at the end of the tail.

Do follow the link to Collingwood's paper, the images there have more detail than is available in these copies.

Looking at the images, I interpret the style as the hair of the ladies with pigtails being parted down the center.  I took the hatching on the stone to mean the sections are braided.  My hair is extremely straight; I have a hard time getting it to hold a curl, and the women's hair I know that is curly doesn't curl in the same perfect loop.  Also the carving that indicates braiding is etched into part of the loop.  This lead me to believe that the loop isn't simply the end of the braid left natural, and had to be coerced into this shape.

For my recreations of this style, I begin by parting my hair down the center and braiding each section to create pigtails.  I use modern clear hair elastics to bind the ends when I get to the bottom. Then I use a large blunt needle, labeled in stores as a tapestry needle, and thick black cotton thread to sew the tail of my hair to itself in a loop. 

This is a photo from last year, a slightly surly (maybe attentive?) expression from the back of court at Egils, but it shows my Norse get up and the loops at the end of the braids.  I've learned that the loops at the bottom need to be joined for at least an inch above the elastic. This helps preserve the round shape.

Hope this give people an option for wearing their hair with their "Viking" clothing.  It's a cute style that I like, though friends have threatened to stick the loops onto things.  The uniqueness of the style helps to complete the look of my garb, and allows me to feel just a little more finished.

Wednesday, April 18, 2012

The Toga wool has arrived!

I'm so excited.  The wool for The Boy's toga arrived yesterday.  I ordered it from a website I'd never seen before, and shipping took a little over a week, which feels slow thanks to the ridiculously speedy delivery from Fabric-store.com I'm used to, but the result is so worth it.  Fabric Mart Fabrics has a somewhat limited selection of fabrics (keeping in mind that I only want natural fibers), but the prices are ridiculously nice, and they take the time to describe not only the weight of the fabric, but how it drapes.  There are suggested ideas of what to use the fabric for, but I don't know that they really pay attention to what they're saying, as they suggest making scarves out of gabardine.

I ordered this ivory wool crepe.  It's gorgeous, lightweight and drapey, and extra wide which I didn't realize before.  I'm looking forward to cutting it into it to make the curved edge, but I'm not sure if I should wash it or not.  I'm worried about it shrinking and getting much thicker than it is now.  The only piece of crepe I've worked with in the past got thick and felted after repeated washing, and I definitely don't want that for this wool.

I suppose I could cut the extra off first, and try washing the extra pieces to see how it washes up before deciding to wash it in the future.  I need to test it, since I want to dye some of the fabric to make the stripe on  the edge.

At least I have the giddy thrill awaiting me tomorrow of having a washer and dryer being delivered!  For the first time since I moved to Oregon, I'll be able to do laundry in my own home!

On today's to-do list, aside from dishes, I need to figure out the classes I'll be teaching at Egils this year.  I have had people ask if I'd teach how to french braid, and, although it isn't period, braided hair is better than a modern style. I'm also trying to figure out what I'm going to say for my more accurate hair styling class.  I think it will be titled "Sewn Hairstyles, Yet Another Thing to Do with a Needle and Thread."  Also on the Egil's front, some friends of ours, and their friends, will be joining us, making our own little camping group this year.  We need to get land reservations in tomorrow, and get to figure out what equipment we have for cooking.  It'll be exciting.

Ah well, lots to do today.  At least last night I made a little progress on the Overly Ambitious Embroidery Project of DOOM! I finished the dark gold color last night.  I need to go buy more skeins of thread, I'm running out of nearly every color.

Keeping Busy,
L

Monday, April 9, 2012

Saturday, April 7, 2012

Working on Fancy New Garb for the pair of us...

The Boy and I are getting "matching" garb.  Since there's a chance we might be the next B&B, I've decided it's time to start working on our "potential investiture" garb for June.  We decided to go Roman should the occasion arise, and even if it didn't, we'll have a nice set of Roman gear to wear.

So I'm sort of in the planning stages.  I purchased some wool for a toga, and then decided to make up a list of garments I wanted to make, and a rough, totally overestimated budget for them.  I've also be perusing period imagery and information sites, looking for the appropriate color combinations and styles that go with the thought of us being invested as territorial governors in Imperial Rome.

For Bastian I was planning to make:

Tunic- Linen with maroon clavi or bands, sleeves?
Toga-Wool with maroon band
Belt-Fabric, gold fringe?
Calcei-Leather, dyed dark red

We're also considering:
Subarmalis?-red linen, gold fringe
Breastplate?-plastic or leather with sculpted embellishments and painted

http://members.ozemail.com.au/~chrisandpeter/
radical_romans/male/tunic.jpg
I'm contemplating how exactly I want to do the Tunic.  I can't decide what the appropriate clavi (stripes on the tunic) would be for himself.  The two narrow stripes on either shoulder indicate equestrian status, and I haven't found a source that says an equestrian class could become a provincial governor.  There are two other clavi patterns repeatedly mentioned online, the senators wore a large stripe down the center of their tunica laticlava, and victorious emperors and generals got to wear the tunica palmate, a purple tunic with gold palm leaves embroidered on it.  Clearly The Boy isn't a victorious general or emperor, so the palmate is out.  I'm not a big fan of the way the senator's tunic looks with the single large stripe center front.  But if it turns out you can't be a provincial governor without being a senator first, then that's the way we have to go.

I read once that the imperial purple was actually a reddish purple, like a maroon, though I can't remember where I saw it.  Since The Boy got his PhD at a school whose colors include maroon, I thought it would be a nice touch.  Himself will be more comfortable in a linen tunic, especially in June, and linen is a sign of wealth.  I'm also not sure about sleeves.  I think I want to do a short sleeve, give him a little more coverage on the shoulder.

toga
http://www.dl.ket.org/latin1/things/holidays/halloween/togas.htm
I've already purchased the wool crepe I intend to use for the toga.  I found a good deal on fabricmartfabrics.com, $9.99/yard for an ivory crepe.  I ordered 7 yards, and when I checked out, they gave me a surprise $2 off per yard, and with the shipping it came to less than $65!  I plan to cut it to a half circle shape of the earlier Imperial togas, mostly to save money on buying fabric, and because it will be slightly easier to wear.  See image 5 as the simplest style.  I'm thinking of visiting Eugene Textile Center and dying the fabric for the clavi and the stripe on the toga to the maroon color.

The belt is pretty simple, a narrow width of fabric, red since Himself is a squire, with fringe.  I like the look of gold fringe.

http://www.florentius.com/calcei-main.htm
The calcei are Roman boots, made from leather with cut work that laces up on top of the foot with some ankle support.  Romans wore boots when outside, and sandals indoors.  The wealthiest Romans with slaves would have a slave to carry their sandals when they visited others.  So The Boy and I both need boots as this will be an outdoor event.  I'm also thinking about making these myself, because shoe making seems exciting, but this particular style requires a last, and I don't know if anyone in the area has a set.  Roman culture has some guidelines for shoe color, and red shoes are reserved for the Patrician class.

http://employees.oneonta.edu/
farberas/arth/arth209/augustus.html
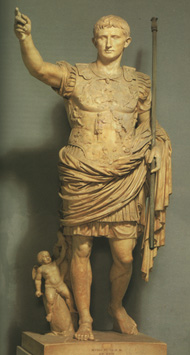
The garments we're considering for him, but aren't sure are the Subarmalis and Breastplate.  They'd be an easy way to save money by excluding them.  I want them because of the image of Augustus in his embossed breastplate and toga looks so mmmmmm!  The combination of militaristic and oratory makes sense for me since Himself is both a fighter and a talker.  If we do manage to get them done, I would make a light weight Subarmalis without all the padding since Himself wouldn't be fighting in it and wouldn't need it.  I'm planning it from Crimson Linen from Fabrics-store.com with the pteruges (strips around the waist and shoulders) done in linen with bullion fringe at the bottoms.  Theoretically, I'd buy a plastic breastplate that is fairly plain, and use Sculpty or something else to create the embellishments, and paint it in a bronze color. 

And now for the parts that I'm wibbling on.

As for my new Garb I was planning to make/aquire:
Tunica interior-white linen, long sleeve
Over Dress-Egyptian style tunic? Gathered neckband? “tapered”?
Palla-silk? Linen? Patterned?
Belt?
Boots-leather, cutwork
Jewelry-moon necklace, two or three drop pearl earrings, coral necklace, bracelets, rings

http://www.touregypt.net/featurestories/
mport.htm
I'm not sure exactly what I'll be making for myself yet, since I can't seem to pick a style.  I know I want a new linen under tunic, the tunica interior which will be plain white and long sleeved.  I might embellish the neckline with a little trim, but not much.  I found a website with a bunch of Fayum mummy portraits, and I love the look of this lady.  The blue and gold are a lovely combination.  The ladies of Roman Egypt all wear colorful tunics, many in red tones, including one in bright pink!  Most have clavi in a dark color, some with a thin gold edging to black bands.  There is a large variety in their jewelry, but the metal all appears to be gold, and there is a frequency of pearls.  Most of the necklaces are chokers, but there are a few with longer.

Alternatively, I could stick to the Roman styles I've been doing and do a sleeveless stola.  There are a couple styles I haven't experimented with yet, specifically the banded stolla as done by Iohanna fillia Iacobi.  http://www.flickr.com/photos/jenthies/842192722/in/photostream/
The banded style or one with the top gathered into shoulder straps are much more appropriate for a woman living in Roman Italy like my persona does.  I'm not sure what colors I'm going to use yet, I haven't found a fabric I'm in love with yet, and there's not much in my stash that's calling to me.  I have a metallic silk stola that I started ages ago that could be finished for this purpose, but because it is so see through I'd want a layer between stola and tunica interior.  No idea on that yet.

Equally, I have no idea what I want to do for the palla.  The fabric I'm currently using for a palla is a gorgeous gold silk sari with metallic threads woven throughout.  But I'm getting a little tired of it.  I'm not sure what I want instead, a linen or wool or silk, patterned or plain, maybe with fringe along the edges?  The sash I'm using now is a brown and white silk, and it's fine, but again, I'm bored with it.  I would love for this to be the opportunity to get something nicer, but I haven't really looked into it.

http://www.florentius.com/calcei-main.htm
I also want to make myself a cute pair of Roman shoes to wear for this.  The same Roman reenactor site that has the cute boots above has a pretty pair of women's shoes.  I want to dye mine red also, because I wouldn't be the wife of a high ranking governor if I weren't high class myself.

I'm looking forward to making some of the jewelry for this outfit.  I've found a little bit of information about the crescent moon pendant worn by many of the Fayum mummies, but I need to find out more.  The little I know is that they are good luck charms against evil, and are likely devotions to Diana.  They're very pretty, and I like adding little things to an outfit that make it more accurate.  I also want to find the findings necessary to make the three drop pearl earrings that are very common in portraiture.

So those are my current thoughts on the fancy new clothes.  I didn't realize I had so much more planning to do on my side.  I suppose I just have to wait a little while for some fabric to speak to me.

Also, I have no idea what to do with my hair!